How Do I Manage My Spam Filter in EdgePilot?
Note: This help article applies only to Hosted Exchange. If you are not sure which email service you use, you can find further information in the following article.
https://www.green.ch/en/which-email-service-do-i-use
In EdgePilot, you can manage the spam filter policies for your Hosted Exchange organisation. You can adjust the filtering and allow or block email addresses, domains and IP addresses.
The spam filter evaluates incoming and outgoing emails based on various technical characteristics. These include sender addresses, IP addresses, links, content and other filtering criteria. The individual checks produce an overall assessment. Depending on the configured policies, a message may be delivered, marked as spam, moved to quarantine or rejected.
Requirements
To manage the spam filter, you need an EdgePilot user with administrator permissions.
Access through a SpamExperts or quarantine link in an email provides only limited functions and not full administrator access.
If there are several administrator users or you do not know which user has administrator permissions, you can use the default administrator:
admin@meine-domain.ch
Replace meine-domain.ch with your own domain name.
You can find further information about assigning administrator permissions in the following article:
https://www.green.ch/en/how-do-i-assign-admin-permissions-to-a-user
Sign In to EdgePilot
Open the EdgePilot administration portal:
- Sign in with a user who has administrator permissions.
- Open Email Threat Protection.
Open the Spam Filter Policies
- In Email Threat Protection, open Settings.
- Select Spam Filter Policy.
- Check the existing settings and the actions specified for the individual assessments.
The policies determine how messages are handled for specific filtering results.
Adjust the Spam Filter Policies
If policies are managed automatically, the Manage Policies Automatically button may be displayed. Manually Manage Policies may be required to make manual adjustments.
Weight10 and Weight15 may be displayed under Weight Review. These settings affect how messages are handled when the corresponding filter assessments are triggered.
- Open Spam Filter Policy.
- Select Manually Manage Policies if the policies are still managed automatically.
- Open Weight Review.
- Check the settings for Weight10 and Weight15.
- Adjust the required settings.
- Select Save.
Note: Less strict filtering may result in more unwanted or dangerous messages being delivered. Therefore, first use the email logs and displayed tags to check which filter rules were triggered for the affected messages.
Check Email Logs and Tags
The email logs in EdgePilot show which external emails were received, sent or rejected and when the respective event occurred.
The tags or check characteristics indicate which filter rules were triggered for a message. Examples of such entries include ARGDBL, LINKRISK, BULKMAILER and WEIGHT10/15/20.
Check the tags before changing a spam filter policy. This helps you narrow down the cause of a rejection or quarantine and avoid adjusting the entire filtering system without reference to the specific check result.
- Sign in to EdgePilot.
- Open Email Threat Protection.
- Select Tools.
- Search for the affected message using the sender, recipient and time.
- Check the status of the message.
- Check the displayed tags and other check characteristics.
- Compare the tags with the spam filter policy settings.
The email logs relate to Email Threat Protection. They record messages sent from or to external domains.
Emails between users in the same Hosted Exchange organisation cannot be tracked by administrators through these logs.
You can find further information about the logs in the following article:
https://www.green.ch/en/hex-logs
Distinguish Between the Spam Folder, Quarantine and Rejection
- Spam folder: The message was delivered and then classified as spam.
- Quarantine: The message was intercepted and not delivered to the mailbox as usual.
- Rejection: The message was not accepted by the receiving system. The sending mail server informs the sender accordingly.
Therefore, check the quarantine and email logs as well as the spam folder. The storage location or status indicates where the message was processed.
Manage Quarantine
- Sign in to EdgePilot.
- Open Email Threat Protection.
- Select Quarantine.
- Search for the affected message.
- Check the sender, recipient and content of the message.
- Select the message.
- Select Release if the message is legitimate.
Release a message only if you consider the sender and content trustworthy.
You can find further information about releasing individual messages in the following article:
https://www.green.ch/en/hosted-exchange-release-email-in-edgepilot
You can find further information about managing quarantine in the following article:
https://www.green.ch/en/manage-hosted-exchange-quarantine
Open the Allowlist and Blocklist
- Sign in to EdgePilot.
- Open Email Threat Protection.
- Select Filters.
You can manage the following entry types in the navigation bar:
- Email addresses
- Domains
- IP addresses
Add Entries to the Allowlist
Use the allowlist when specific email addresses, domains or IP addresses should be explicitly allowed.
- Open the required section for email addresses, domains or IP addresses.
- Open the section for allowed entries.
- Select Add.
- Enter the required email address, domain or IP address.
- Select Save.
When releasing a message from quarantine, administrators can add the sender to the allowlist at the same time.
Note: An allowlist does not guarantee that every message will be delivered. Messages may still be flagged by other security checks, for example if they contain known malware or a virus.
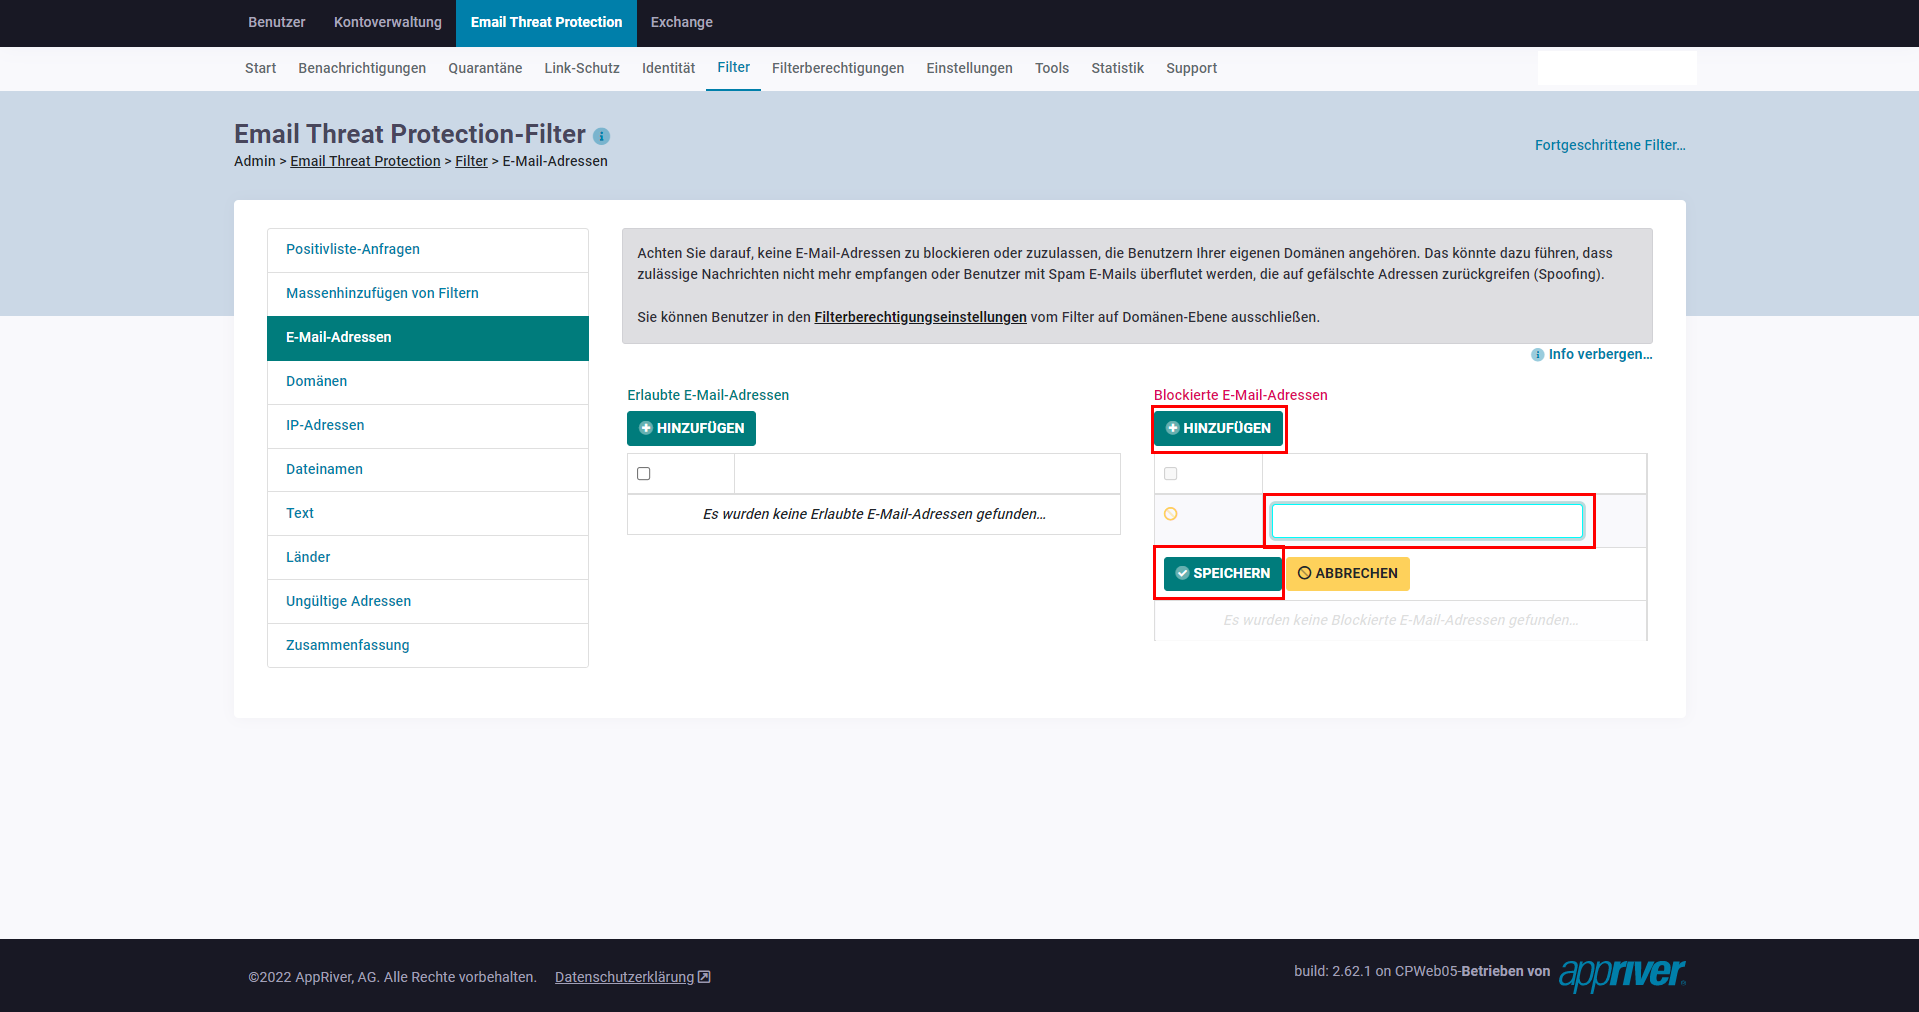
Add Entries to the Blocklist
For individual unwanted senders, blocking the specific email address is the recommended approach.
- Open the required section for email addresses, domains or IP addresses.
- Open the section for blocked entries.
- Select Add.
- Enter the required email address, domain or IP address.
- Select Save.
A blocklist is suitable for individual known senders. For attacks involving constantly changing sender addresses, such as mail bombing, blocking individual addresses is less suitable.
Effects of the Allowlist and Blocklist
The entries apply to the entire Hosted Exchange organisation. An adjustment is therefore applied to all associated email addresses.
Before allowing or blocking an entire domain, check whether the change could affect other desired senders.
Why Known Senders May Be Classified as Spam
The spam filter evaluates messages based on technical characteristics, not on how well known a company is or your personal relationship with the sender.
Legitimate senders may also use bulk mailing systems, tracking links or technical structures that meet spam criteria. An expected message may therefore be classified as spam or moved to quarantine.
In this case, first check the email logs and associated tags. Add the sender to the allowlist if necessary or adjust the affected policy specifically.
Further Information
You can find further information about Hosted Exchange, spam and quarantine in the following articles:
https://www.green.ch/en/all-about-hosted-exchange
https://www.green.ch/en/hex-everything-about-spam-and-quarantine
https://www.green.ch/en/hosted-exchange-spam-filter-policies
https://www.green.ch/en/hex-spam-filter-reason-and-responsibility
https://www.green.ch/en/hex-spam-filter-set-too-strictly
https://www.green.ch/en/what-to-do-about-so-much-spam
https://www.green.ch/en/what-is-spam